Chocolate Crème Brûlée
This Chocolate Creme Brulee is the best chocolate pudding you’ve ever had, topped with a crispy torched sugar crust. Five simple ingredients turn into something magical!

Save This Recipe!
“The Chocolate Creme Brûlée is so delicious and she takes you step by step. It’s really fail safe. I had never had chocolate but oh what a game changer. I will definitely be trying more of her recipes.”
—Marilyn
You didn’t think I was going to create and perfect a vanilla bean creme brulee recipe without also bringing you it’s dark and mysterious cousin – chocolate creme brulee – did you?
I wouldn’t do that to you! After countless tests in my kitchen to perfect this recipe as well, I’ve fine-tuned it to achieve the perfect balance of silky, chocolate custard topped with that signature crackly, caramelized crust.
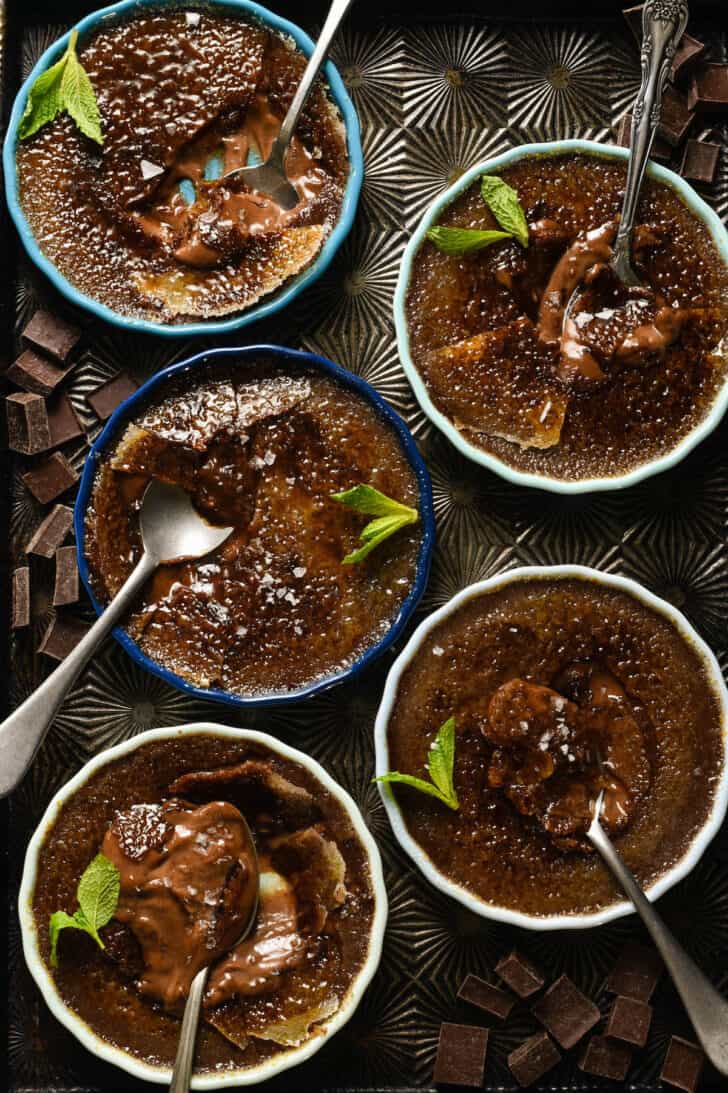
If you’ve never tried chocolate creme brulee, imagine eating the most decadent chocolate pudding you’ve ever tasted, but with a crisp sugar shell you get to crack with a spoon.
Ready to make this dessert magic happen? Let’s dive in. The best part is that you’ll only need 5 ingredients!

Introducing A Partnership With Harvest Chocolate
Today, I am introducing a partnership with Harvest Chocolate. The makers behind this bean-to-bar chocolate are Elizabeth and Matt, partners who spent years working in fine dining restaurants all over the country before coming home to Michigan to create Harvest Chocolate.
They make their chocolate entirely from scratch, from purchasing the beans to packaging the bars. They run their business using fair-trade practices, supporting farmers, and using simple, organic ingredients.
And when I say coming home, I really mean it – Elizabeth and I grew up on the same street (my parents still live on that street). We are literally childhood friends. We recently reconnected via Instagram over our love of savory food and chocolate, of course.
Our partnership is unique. No money is changing hands, so I’m not being paid to tell you that Harvest Chocolate is the best I’ve ever had. It’s simply the truth, from the bottom of my heart. I snack on it most evenings, and just a few pieces are enough to satisfy my sweet tooth.
You may have noticed (I certainly have) that Foxes Love Lemons has a ton of caramel recipes like caramel coffee, but woefully few chocolate recipes. Every year, when I’m looking for Valentine’s Day food, I notice this (although don’t sleep on my heart jam cookies)!
So, once every few months, Elizabeth and Matt will be developing a recipe using their chocolate (including an amazing fudge brownie pie and cream cheese chocolate cake recipe), and I will be photographing it and publishing it here.

Chocolate Creme Brulee Recipe Ingredients
- heavy cream – We use heavy whipping cream for this recipe, and that’s it. Some people use a combination of cream and milk, but if I’m splurging and making creme brulee, I like it extra rich (cream is also what I use to make my microwave caramel sauce decadent).
- granulated sugar – you’ll need this for both the custard and for sprinkling on top to torch.
- egg yolks – you’ll need the yolks of 5 large eggs for dark chocolate creme brulee. Perhaps try an egg white omelet with the leftover whites?
- dark chocolate – you will need 4 ounces of high quality dark chocolate for this recipe. We used Harvest Chocolate Ghana Snacking Chocolate (chocolate cut into small pieces perfect for easy snacking or baking). It is 68% dark chocolate with a rich and fudgy flavor profile. Any of the Snacking Chocolate varieties would be perfect for this dessert, a yogurt parfait bar, and for chopping up and sprinkling over Black Forest cupcakes.
- sea salt – The finished dessert won’t taste salty, but it will taste balanced.
- blowtorch – you can use a specially made kitchen blowtorch, or just one from the hardware store. I use the full size hardware store kind. If you don’t have a blowtorch, no worries – I have another option for you below!
- ramekins or creme brulee dishes – you’ll need six ceramic ramekins or dishes that are oven safe and will hold at least 6 ounces of liquid for this chocolate creme brulee recipe.
How To Make Dark Chocolate Creme Brulee
Prep The Ramekins And Roasting Pan
The first step to this recipe is preheating your oven to 250 degrees F and bringing a tea kettle of water to a boil on the stove.
This is a lower oven temperature compared to some of my other creme brulee recipes on account of the chocolate. Baking at a lower temperature yields a really silky smooth dark chocolate creme brulee.
You will need a roasting pan or a very large baking pan with high sides for this chocolate creme brulee recipe. If you have a big pan you break out once a year for root beer ribs, well, now you’ll need to break it out twice a year.
All of the ramekins need to fit onto the bottom of the pan in an even layer.
Once the custard mixture is prepared (more on that below), you will be dividing it between the ramekins. Then, place the roasting pan with the filled ramekins onto a pulled-out oven rack.
Carefully pour boiling water from the kettle into the pan around the ramekins. Be sure not to get any water into any of the custards.
You want to fill the pan with enough hot water so that the water comes up to the halfway point of each ramekin. This hot water bath will allow the custard to cook evenly without cracking.
Once the hot water is poured in, carefully push the oven rack with the roasting pan on it fully into the oven.
To Make The Custard
- In a small saucepan, combine the cream and half of the sugar.
- Heat this over medium heat until the cream just starts to bubble around the edges of the pan. Watch it carefully, because you don’t want the mixture to come to a full rolling boil.
- While you’re keeping one eye on the cream, grab a large bowl and whisk together the egg yolks and the rest of the sugar.
- Once the cream mixture starts to bubble, turn off the heat. Add the chocolate and sea salt and whisk until the mixture is smooth and the chocolate has completely melted.
- Grab a ladle and slowly add 3 ladles of the hot chocolate mixture to the egg mixture while whisking constantly. Then, whisk the remaining chocolate mixture into the egg mixture while continuing to whisk.
- Strain the mixture through a fine-mesh strainer set over a large liquid measuring cup. Don’t skip the straining! Just like with the custard for my apple rose tart and the lemon curd in my lemon curd cake, it’s important to ensure the smoothest, creamiest final product. The strainer will catch any cooked egg pieces or bits of chocolate that didn’t melt.
- Then, divide the strained dark chocolate creme brulee mixture between the ramekins in the roasting pan.
- Bake the custards 40 to 50 minutes or until they are JUST set. Gently shake one of the ramekins, and the custard should tremble slightly in the middle but be set on the outer edges.

Chocolate Creme Brulee Recipe Home Chef Tips
A Note About Ramekin Size
Size DOES matter for creme brulee ramekins. Not only will you need six 6 ounce ramekins, but you’ll need to pay attention to the shape of them and how it will relate to the baking time for this recipe.
If your ramekins are wide and shallow, your custard may bake a little faster. If your ramekins are narrow and deep, you will likely need to bake your custard longer.
In the photos you see in this post, I’m using wide and shallow ramekins, and my custard took about 45 minutes to bake until it was just set (the middles still trembled slightly, while the custard was set on the outer edges).
If you use narrow and deep ramekins, start at 40 minutes and continue baking, checking every 5 minutes, until your custard is just set. It could take up to an hour and 10 minutes.

Torching Chocolate Creme Brulee
First of all, you want to be sure to get an EVEN layer of sugar across the surface of each custard.
I sprinkle the tablespoon of sugar across the custard as evenly as I can, and then I kind of tilt and shake and shimmy the ramekin until it’s even more evened out.
Once you start torching the sugar, it’s important to remember to keep the torch moving constantly so none of the areas burn.
Now, dark chocolate creme brulee is a little bit harder to torch than any other type of creme brulee, because it’s already brown! It’s hard to see sugar browning on top of something brown.
So, you will be relying on your instinct as well as your sense of smell when torching.
If you start to smell any sugar burning, stop torching immediately. Dark brown sugar is delicious, but burnt sugar is just bitter.
Can I Make Creme Brulee Without A Torch?
Absolutely! If you don’t have a blowtorch and don’t want to keep one around the house (I don’t really blame you), you can still make this chocolate creme brulee recipe.
After the custard bakes and chills, instead of browning the sugar on top with a blowtorch, you’ll be using the broiler on your oven (also how I finish my salmon with my bourbon glaze recipe for salmon). It’s a little bit trickier, but I know you can do it.
Place the top oven rack as close as you can get it to the broiler element, and set the broiler to low. Place the chocolate creme brulee ramekins, with sugar sprinkled on top, on a pan and slide the pan beneath the broiler.
Watch very carefully and rotate and move the ramekins around (using tongs or pot holders) until the sugar is evenly browned but not burnt. And that’s it! It’s easy enough to make creme brulee without a torch, right?

Storing Chocolate Crème Brûlée
How Long Can You Keep Chocolate Crème Brûlée In The Fridge?
When tightly wrapped with plastic wrap, creme brulee can be kept in the fridge for up to 2 days before torching and serving. Creme brulee is best stored in the refrigerator after baking, but before torching.
Can Chocolate Crème Brûlée Be Frozen?
Or, if you want to make all 6 but can’t eat them right away, chocolate creme brulee is able to be frozen!
To freeze, complete the recipe below through Step 6, but instead of transferring to the refrigerator, wrap and transfer to the freezer instead. It’s best if you put the wrapped ramekins in a freezer bag, as well. The custards should keep about 3 months in the freezer.
When ready to serve, thaw in the refrigerator for about 4 to 6 hours, and then sprinkle the tops of the dark chocolate creme brulee with sugar and torch just before serving.
More Foxes Love Lemons Favorites

Chocolate Brulee
Save This Recipe!
Ingredients
For the Custard:
- 2 ½ cups heavy cream
- 8 tablespoons granulated sugar divided
- 4 ounces dark chocolate chopped
- ½ teaspoon sea salt
- 5 large egg yolks
For the Topping:
- 6 tablespoons granulated sugar
- Mint sprigs and flaky sea salt for garnish (optional)
Instructions
- Preheat oven to 250 degrees F; heat large kettle of water to boiling. Place six 6-ounce ramekins (see Home Chef Tip) in roasting pan.
- In small saucepan, heat cream and 4 tablespoons sugar over medium heat 6 to 7 minutes until cream just starts to bubble around edges of pan (do not bring to a full boil).
- Once cream starts to bubble, turn off heat. Add chocolate and salt and whisk until chocolate is completely melted and mixture is smooth.
- Meanwhile, in large bowl, whisk egg yolks and remaining 4 tablespoons sugar until well combined. While whisking, use ladle to slowly add 3 ladlefuls of hot chocolate mixture to egg mixture. Gradually whisk in remaining chocolate mixture. Strain through fine mesh strainer into large liquid measuring cup.
- Divide custard mixture between ramekins; place roasting pan in oven. Add enough boiling water to come halfway up sides of the ramekins. Bake 40 to 50 minutes or until custards are just set (they should tremble slightly in the middle, but be set on outer edges).
- Use tongs or pancake turner to carefully transfer ramekins to cooling rack; let stand 30 minutes. Cover with plastic wrap and refrigerate at least 4 hours or up to 2 days before serving.
- To serve, sprinkle 1 tablespoon sugar over each custard. Using blowtorch, caramelize top of each custard until sugar bubbles and turns brown (this can also be done under a broiler). Top with mint and sea salt and serve immediately.
Notes
- If your ramekins are wide and shallow, your custard may bake a little faster. If your ramekins are narrow and deep, you will likely need to bake your custard longer.
- In the photos you see in this post, I’m using wide and shallow ramekins, and my custard took about 45 minutes to bake until it was just set (the middles still trembled slightly, while the custard was set on the outer edges).
- If you use narrow and deep ramekins, start at 40 minutes and continue baking, checking every 5 minutes until your custard is just set. It could take up to an hour and 10 minutes.

The Chocolate Creme Brûlée is so delicious and she takes you step by step. It’s really fail safe. I had never had chocolate but oh what a game changer. I will definitely be trying more of your recipes.
I am so glad to hear you liked this, Marilyn. I agree, chocolate creme brulee is kind of a game changer!